

Creating animated GIF images can be fun and sometimes useful. I used it to demonstrate the power of the align and distribute tool in an earlier article [1]. This time, I'll share the fun.
We are going to create a simple animation of a stick figure dribbling a basketball. I used Libreoffice Draw [2] to create the two images and GIMP [3] to animate them as well as smooth out problems. Both programs are multi-platform, free and open-source.

For those who want to create the same animation as a simple example, I'll outline the steps that I took to create the stick figure. However, if you wish to skip ahead to the animation part, scroll down to Part 2.
Part 1: Creating the two images
Step 1:
Open Libreoffice Draw and draw a circle using the circle tool (under basic shapes).

Step 2:
Using the connector tool, draw a line downwards from the bottom edge of the circle.


Step 3:
Now we are going to create the arms. Using the line tool, create one arm. Do not attempt to create both arms with one line as we will have to bend one later to create the animation.

Step 4:
Copy and paste the one arm and move it to the other side of the stick figure to create the second arm.
Step 5:
Now we are going to create the legs. Draw an inclined line from the "waist" of the stick figure. Do not make the inclination too great as we must have space for the ball to bounce.

Step 6:
Copy and paste the leg. Afterwards, right click on the leg and click on
Flip » Horizontally. Then all you have to do is move the other leg into position.

Step 7:
Now we have a complete stick figure without a ball. Let's throw him one.

To create a ball, just create another circle using the circle tool. Right click on the circle and click on Area. Choose anything you like.

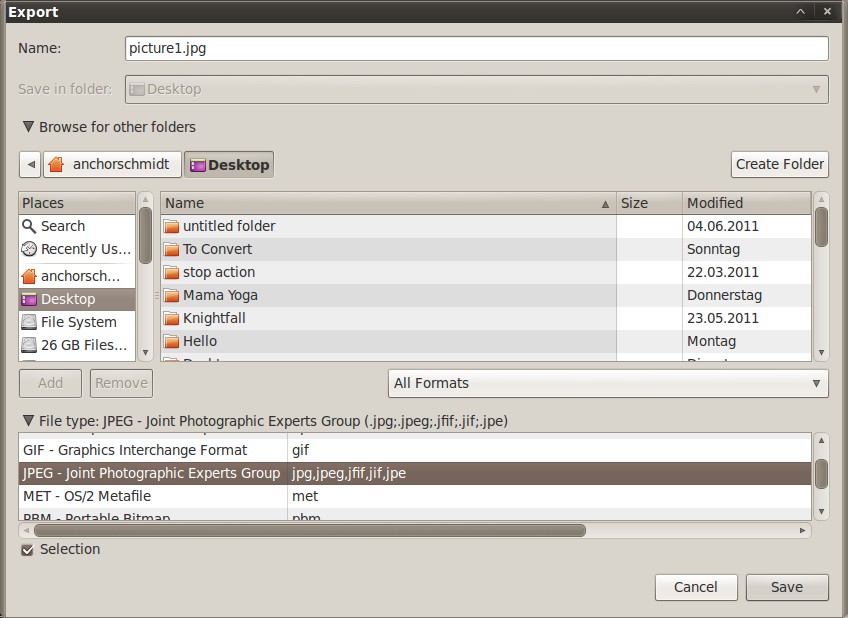
Now we have to export this image as it will form the first of the two images that will be animated.
Step 8:
Press Ctrl+A to select everything. Then go to File » Export. Make sure to mark the checkbox called selection and save it as a gif image. This is to ensure that the same colour palette will be maintained and no loss of quality will take place.

Step 9:
Now we must return to the image to make a few minor adjustments. Namely:
- Move the ball downwards.
- Make the arm bend downwards.

Step 10:
We will now have to export this image as well. Press Ctrl+A again and export the image as a gif file.


The battle is only half won. Let's stitch these images together. Now I'll show you how to do so in order to avoid possible pitfalls.
Part 2: Animation
Step 1:
Open GIMP. Go to File » Open As Layers and then open both images.
Step 2:
Both images may not be the same size. To avoid complications later on, expand the canvas to accommodate both layers. This can be done by going to Image » Fit Layer to Canvas.
Step 3:
Both images might not be perfectly superimposed on one another. You can see in the below image how one arm is sticking out on the left. This can be easily corrected.

We will first have to alter the opacity of the top layer using the sliding bar present on the "Layers" window.

This will allow us to easily observe if both images are properly superimposed or not.

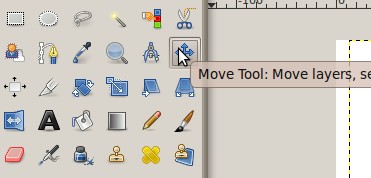
Step 4:
We can now use the "move" tool to move one layer. The move tool is present in the Toolbox window.
After moving the layer, your image should now look like this.

Step 5:
Set the opacity back to 100% and just as you thought that we were done, we encounter another problem. An action line is visible from the bottom layer and we must fix it.


This is annoying but easily fixed. Create a new layer by going to Layer » New Layer.

Select "White" under Layer fill type.
Step 7:
Use the "move" tool again to move the white layer on top of the action line.
Step 8:

Step 9:
Right click on the new layer and then click on "Merge Down". Go to Image » Fit Canvas to Layers again.
Step 10:
One can do this by right clicking on a layer (on the "Layer, Paths, Channels" window) and then going to "Edit Layer Attributes". A window will appear and you can enter the time that you wish to hold this particular layer. I find that 170ms is an appropriate period for this particular example.

Step ∞:
Go to File » Save As and then save the file as a GIF image.

Once you click on save, a window will come up asking you if you would like to flatten the layers or save the image as an animation. Don't skip hastily past this one.

Another window will pop up but you can skip this one and click on save.
Now you have your stick figure in all its bouncing glory. Enjoy!
[1] The most useful tool for creating presentations
[2] Libreoffice.org
[3] Gimp.org
P.S: GIF stands for Graphics Interchange Format.
Word count: 1014
| All articles | The Review Meter | How Software is reviewed |
No comments:
Post a Comment